Example #1: Capture Image
Step #1: Download & Install![]()
Step #2:
Using the capture tab
You can pick a hotkey to start
A hotkey is a keyboard shortcut that allows you to capture quicker.
F6 is ScreenHunter’s default image capture hotkey; however, you can
choose any key combination or a single key as your hotkey. You can
always click the Capture Now button to capture.
In this example, we selected the Rectangular area in the Screen group and changed the settings by clicking
the button on the right.

In the Add
group, select Cursor.

Step
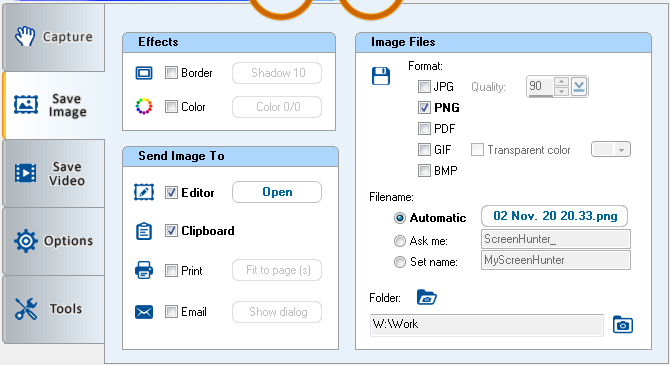
#3: Choose Where to Save Your Capture: "Save Image"
- In
this example, we went to the Save Image tab, and selected
Clipboard to copy the capture to the Windows Clipboard, and
selected Editor so we can edit the capture directly after.
- In
the Image Files group, select PNG to save as a PNG
file.
- Selecting
Automatic for the filename creates an automatic name for
the file. To change the format, click the filename button to the
right.
Step
#4: Capture
- To
capture, click Capture Now, which is the camera button at
the top
- or
Press your hotkey on your keyboard, F6 in this case, to capture immediately.

- Click
and hold down the mouse button, then drag to select an area on
screen. Release the mouse button to capture.
- If
you have selected the Adjust feature on the Rectangular
Area Settings dialog, the selected area is then highlighted.
You can use your mouse or arrow keys to adjust the size of the
area and click the camera button to capture an image. Also, you
can press Enter or the Space bar on your
keyboard to capture.

To skip this step, you can do the following:

|
Step
#5: Get Your Screenshot
|
|

To
Cancel
Press the Esc key or right-click the mouse button at any
time to cancel. In the Adjust mode, you can click the cancel
button on screen to cancel.
Example
#2: Record Video
Recording a video uses
many similar settings and operations as capturing an image.
Step
#1 & #2 are
the same as Capturing an Image.
Step
#3: Choose Where to Save Video: "Save Video”
- In
this example, on the Save Video tab, check Sound
to record audio in your video, and choose a Quality and
your specific Frame rate.
- In
the Video File group, check MP4 to save as an
MPEG-4 file.
- Select
Automatic for the filename and click the filename button to
the right if you want to change the format.

Step
#4: Record
-
Click Record Now to record, which is the video button at
the top.
- or -
Press your hotkey on your keyboard, F8 by default, to start
recording.

- Press
the left mouse button down and drag to select an area on the
screen, then release the mouse button.
- If
you have selected the Adjust feature on the Rectangular
Area Capture Settings dialog, by releasing your mouse, the
selected area is then highlighted. You can use your mouse or arrow
keys to adjust the size of the area and click the video button to
start recording.

To Stop
When recording has started, the Record Now button will be changed to a Stop button.

You can click it to stop, or you can press the stop hotkey or Esc to stop.
When recording, the flashing indicator can be shown and you may click the Stop button at the bottom to stop.

Step #5 is the same as Capture
Image.
Just to Note:
These are a couple of very basic ways to use ScreenHunter, but we have developed ScreenHunter to adapt to whatever your needs may be. Discover features that are perfect for your needs, whether it be scheduling a certain time every day to capture changing stocks or recording a video interview with a person across the country. The possibilities are endless with ScreenHunter.


